App Intents Tutorial: A Field Guide for iOS Developers
Learn how to make your first App Intent and then go deeper into advanced topics like Apple Intelligence, Spotlight and more.
An App Intents field guide
Recently, Apple introduced Apple Intelligence at WWDC 2024, emphasizing how Siri can handle repetitive tasks and complex workflows by understanding your app's capabilities. To enable this, developers need to use the App Intents framework — arguably the most critical framework developers should understand today.
This guide uses "Caffeine Pal," a caffeine tracking app, to demonstrate building App Intents from scratch and unlocking functionality across the iOS ecosystem including:
- App Shortcuts
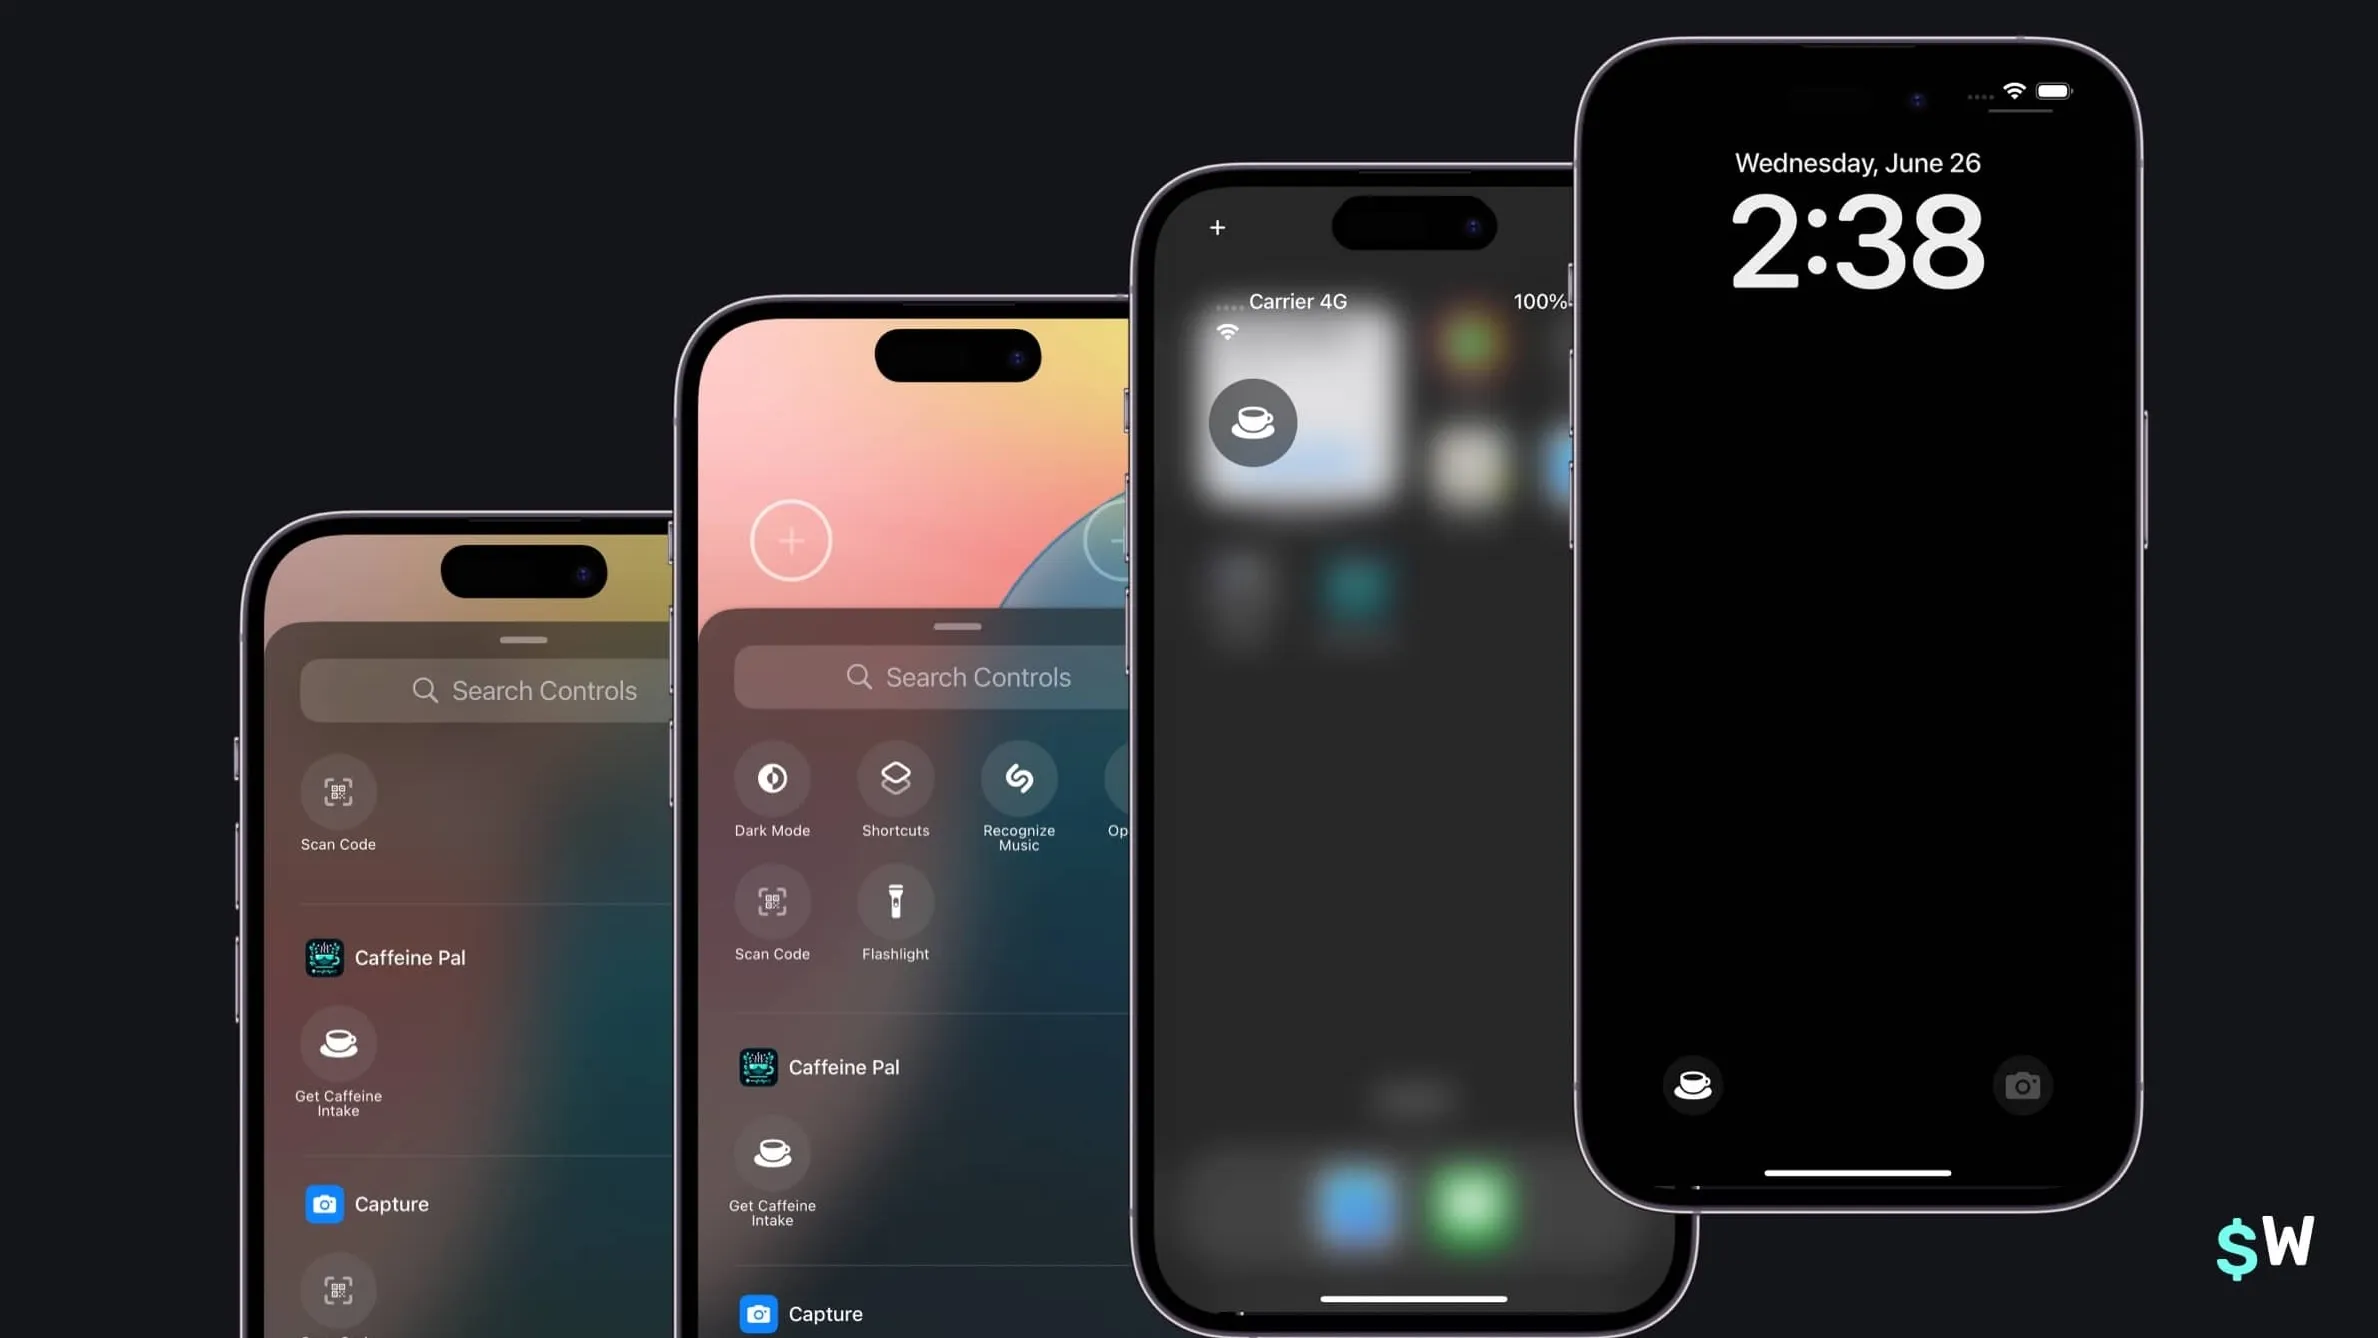
- Spotlight search and suggestions
- Control Center and Lock Screen controls
- Interactive widgets
- Siri
- Action Button and Apple Pencil Pro gestures
What are App Intents?
App Intents expose your app's functionality to the system, allowing actions to be invoked outside the app context. Each action gets its own intent, opening your app to the entire iOS ecosystem. As noted in the documentation, intents enable access to "Spotlight search and suggestions, Shortcut actions in the Shortcuts app, Action button, Apple Pencil Pro, WidgetKit suggestions and Smart Stack, Focus Filters, Accessibility Actions, Live Activities, Control Center and Lock Screen controls (new in iOS 18), and Apple Intelligence in iOS 18."
An App Intent, in basic form, conforms to the AppIntent protocol
and provides:
- A name for the intent
- A description of its function
- A function performing that action
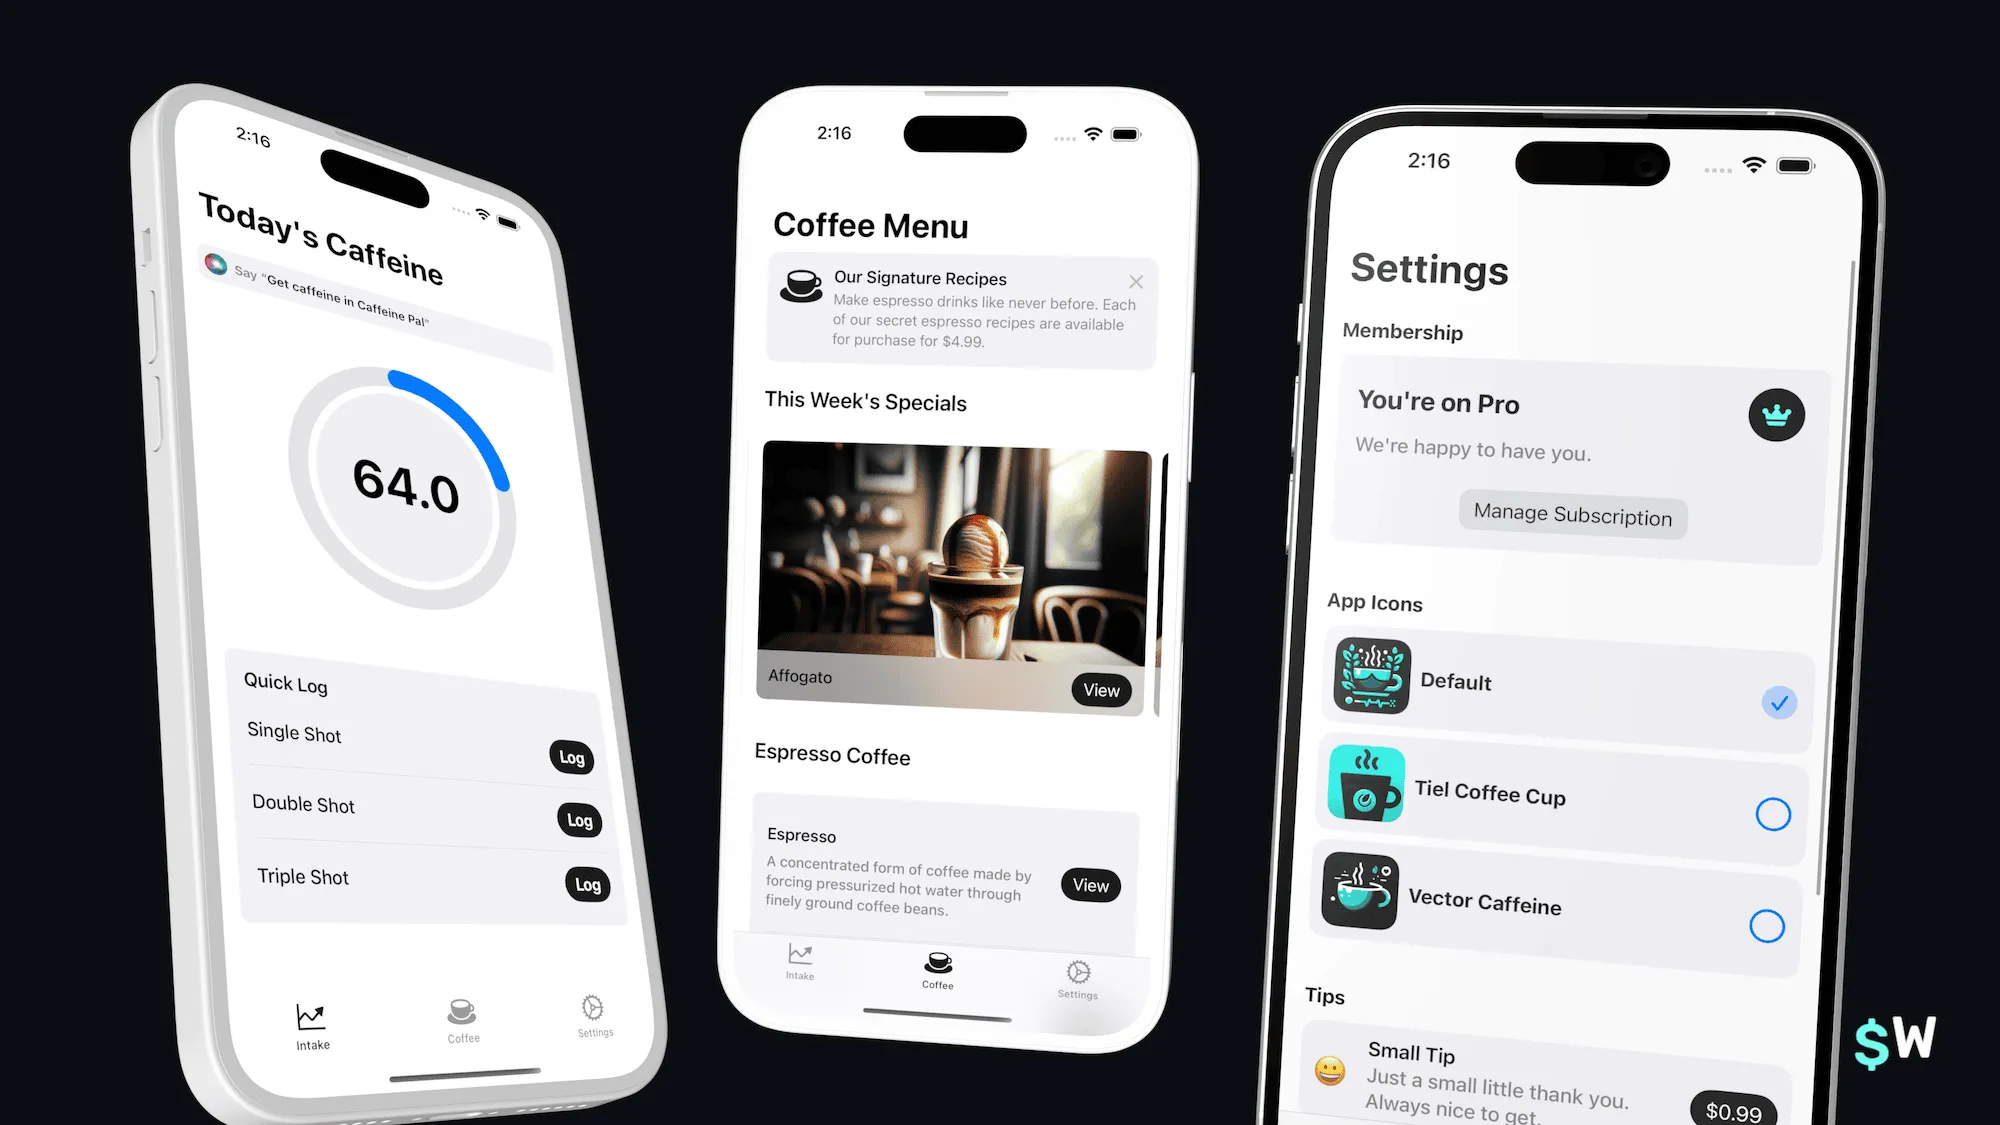
Our first App Intent
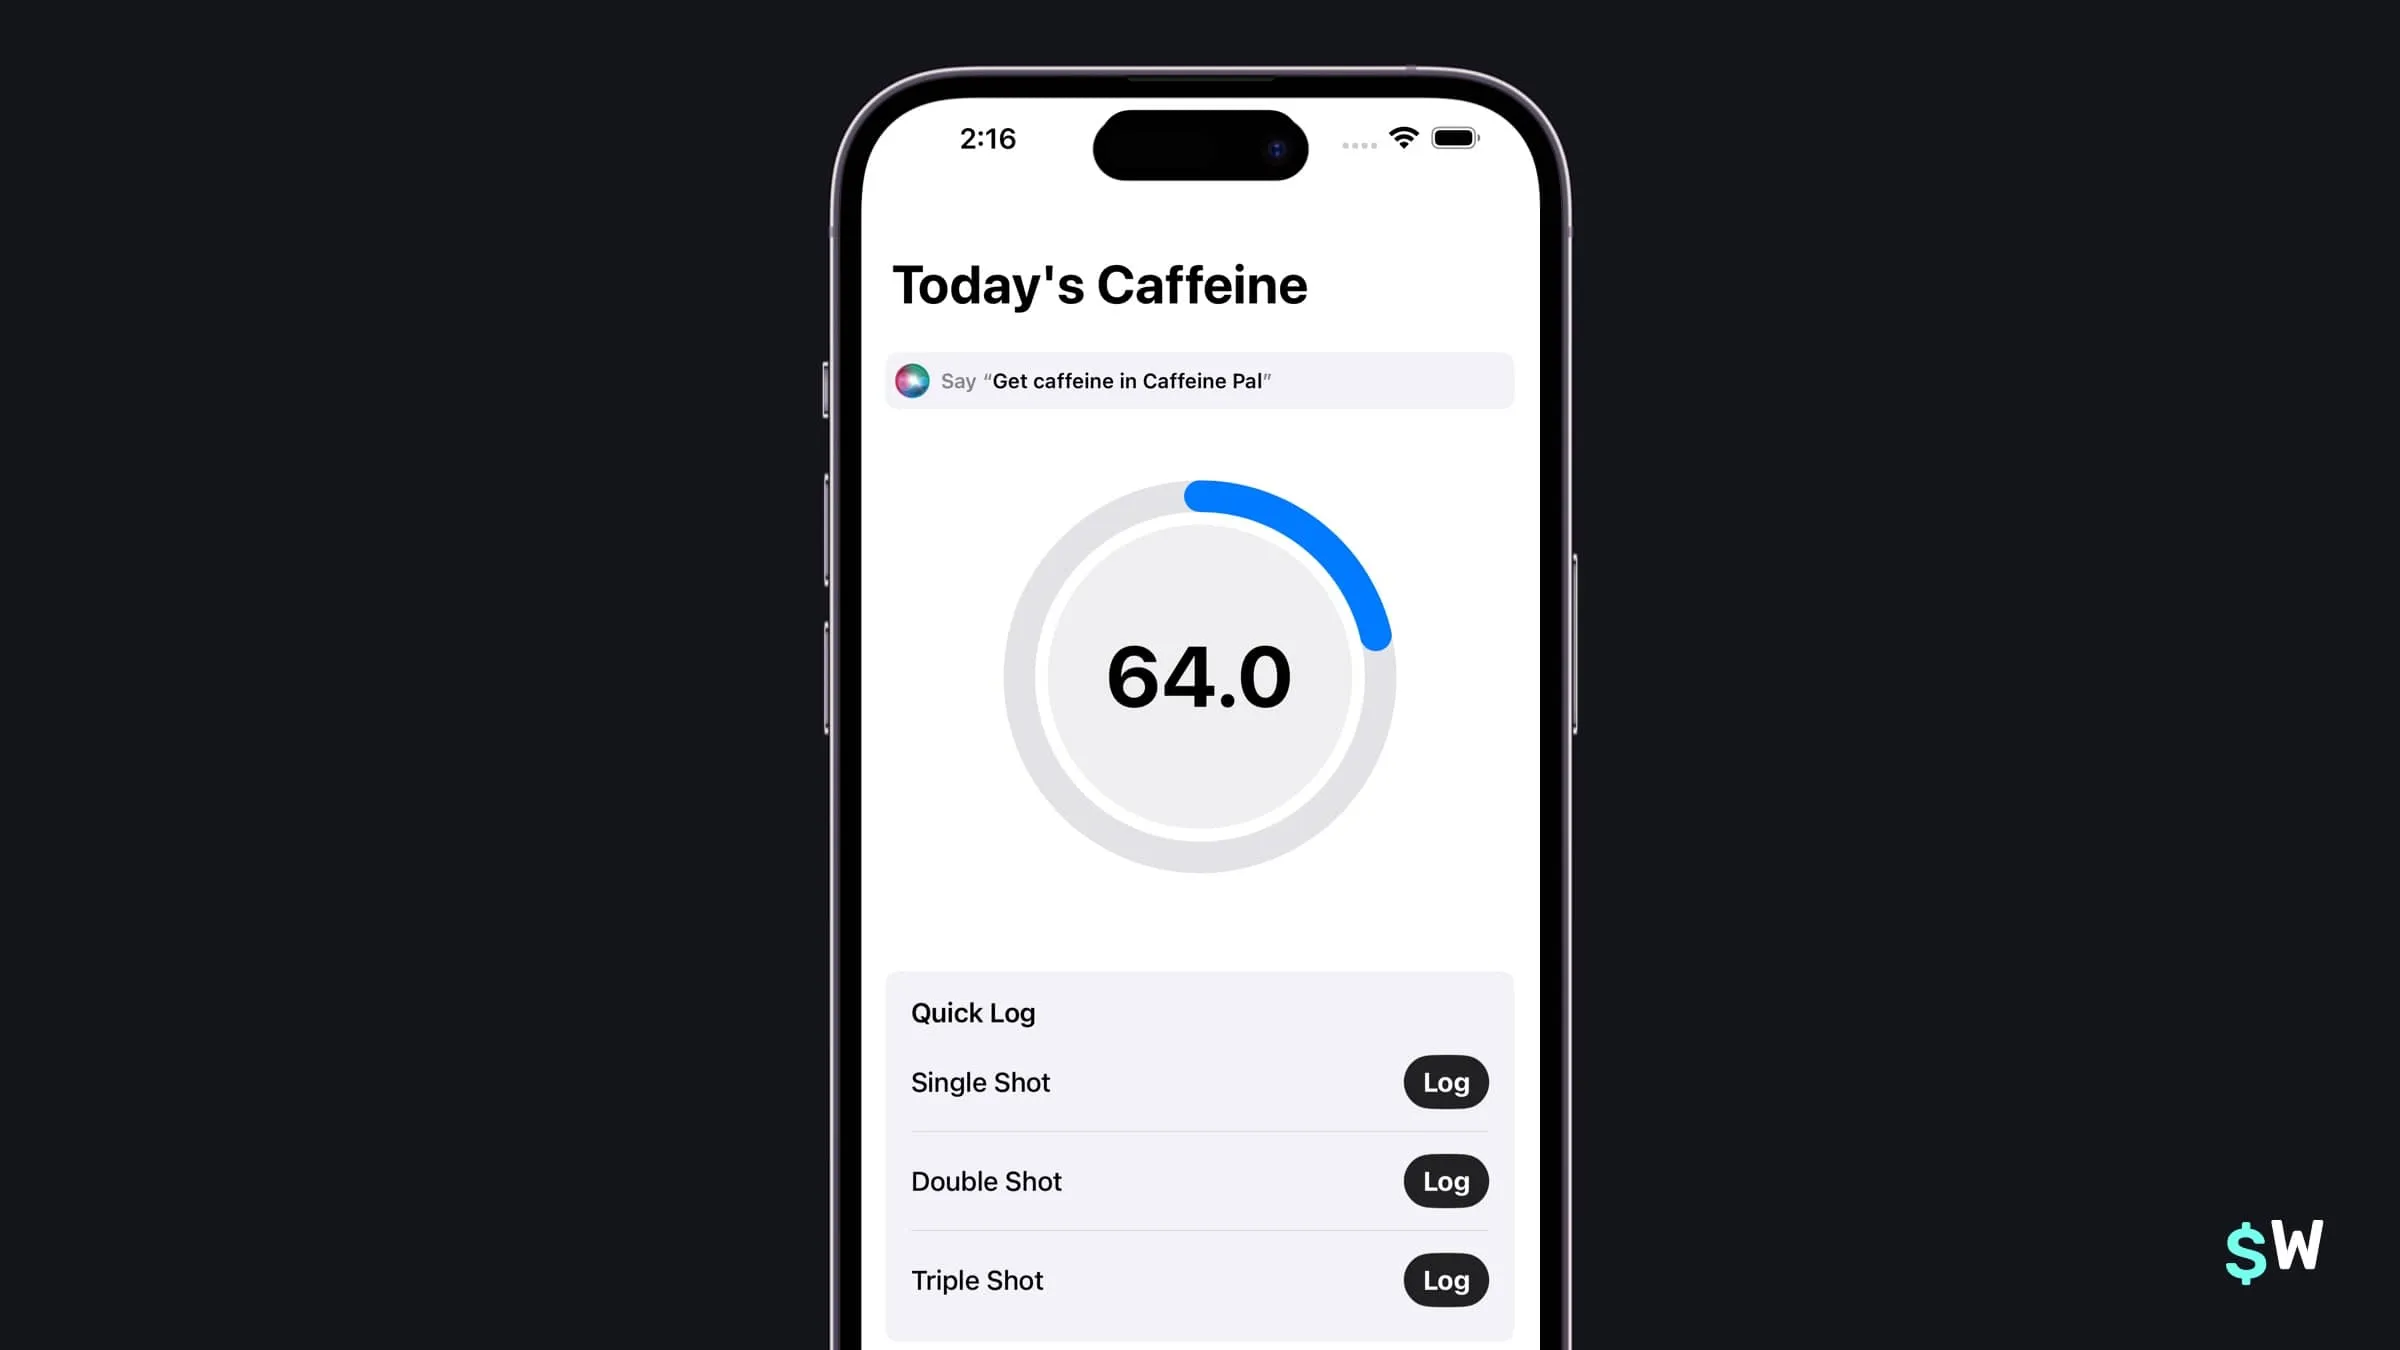
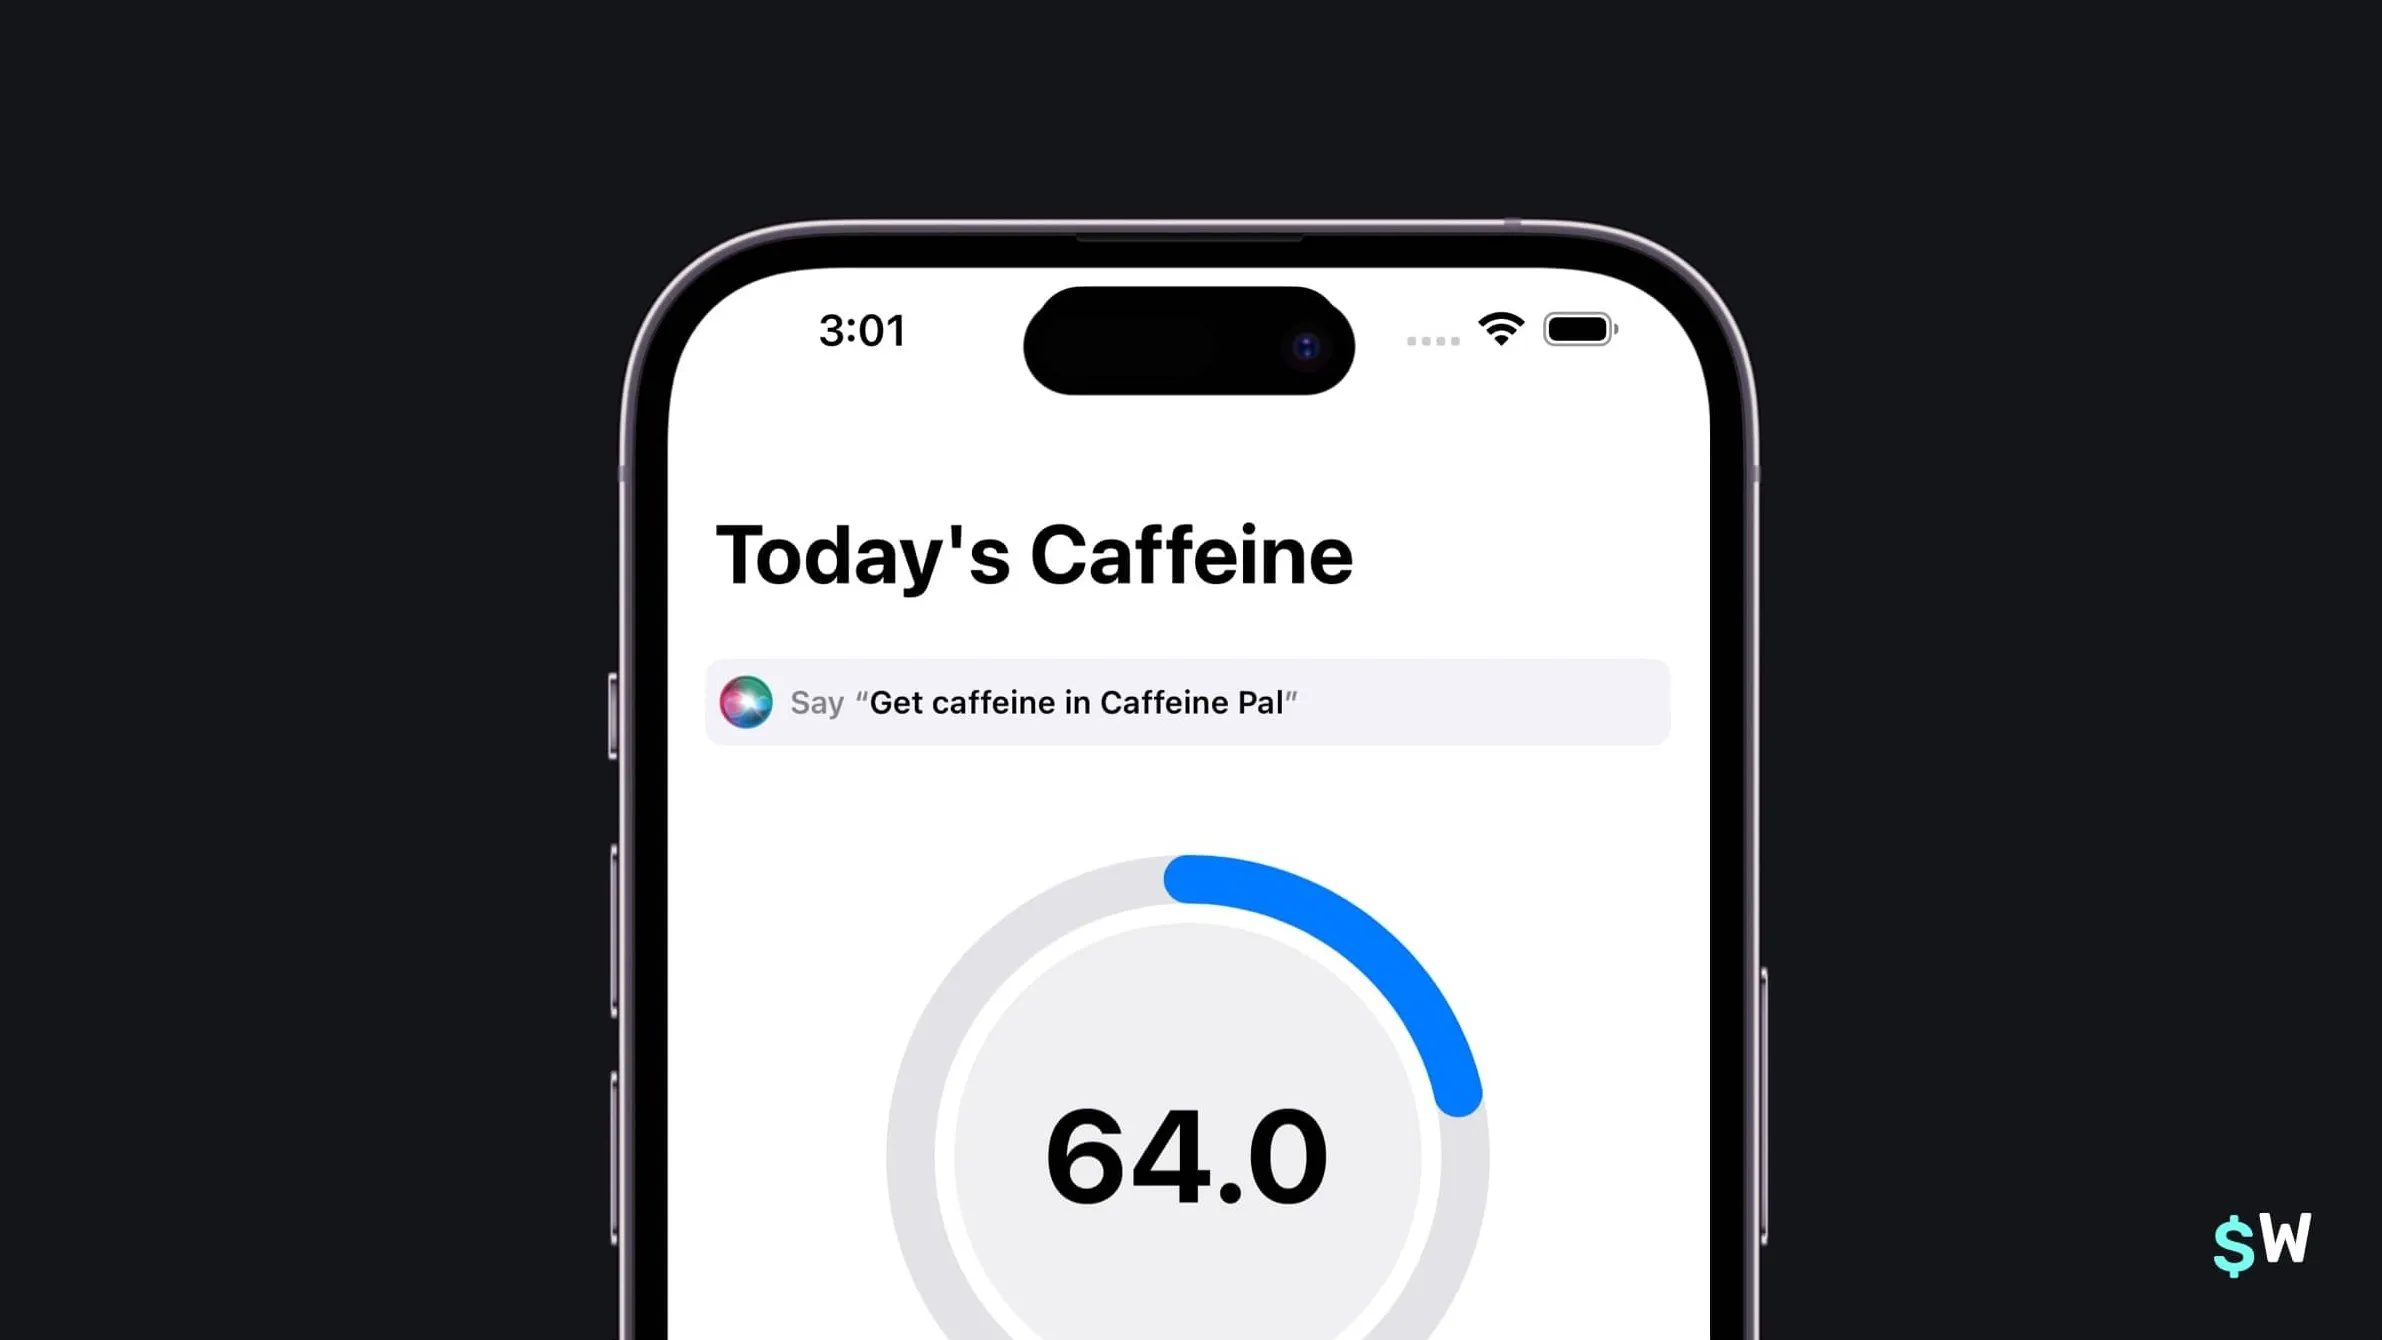
The overview screen showing daily caffeine consumption is an excellent candidate for an intent. Key considerations:
Important classes like CaffeineStore should be part of multiple
targets (widgets, live activities, etc.), and core functionality should be
easily accessible through singletons or similar patterns.
Here's the basic implementation:
struct GetCaffeineIntent: AppIntent {
    static var title = LocalizedStringResource("Get Caffeine Intake")
    static var description = IntentDescription("Shows how much caffeine you've had today.")

    func perform() async throws -> some IntentResult {
        let store = CaffeineStore.shared
        let amount = store.amountIngested
        return amount
    }
}
However, this requires specifying the correct return type. Intents must
return some IntentResult, never primitive types directly:
func perform() async throws -> some IntentResult & ReturnsValue<Double> & ProvidesDialog {
    let store = CaffeineStore.shared
    let amount = store.amountIngested
    return .result(value: amount,
                   dialog: .init("You've had \(store.formattedAmount(for: .dailyIntake))."))
}
This single intent definition enables integration across the system.
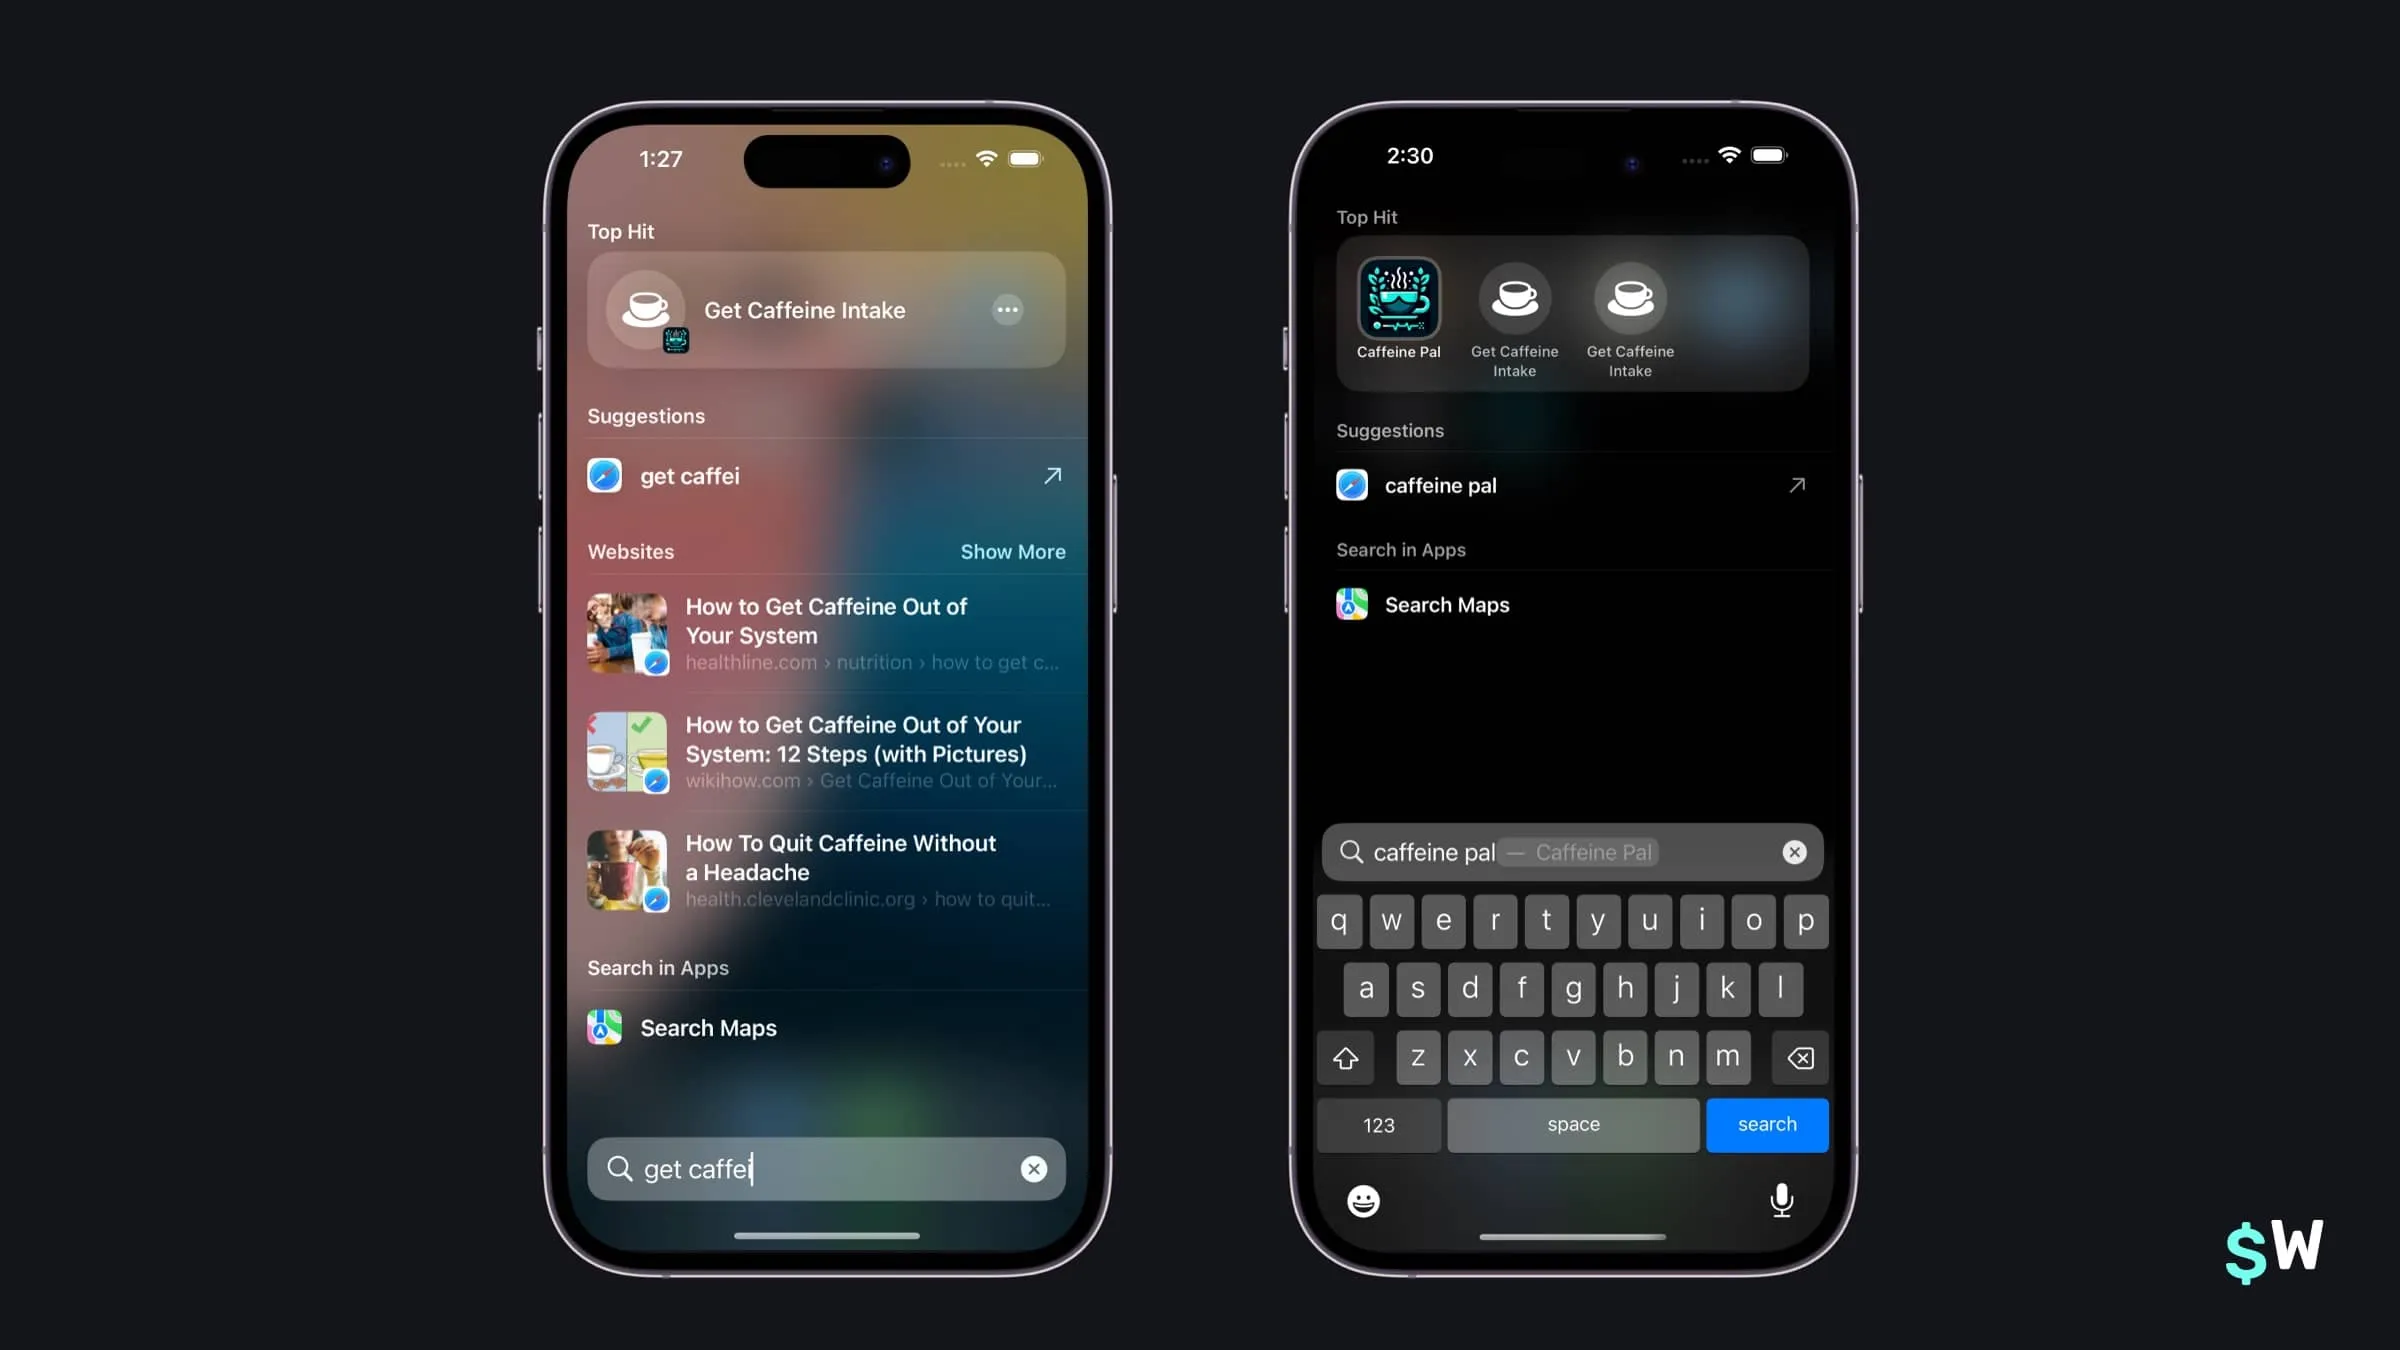
App Shortcuts and Siri
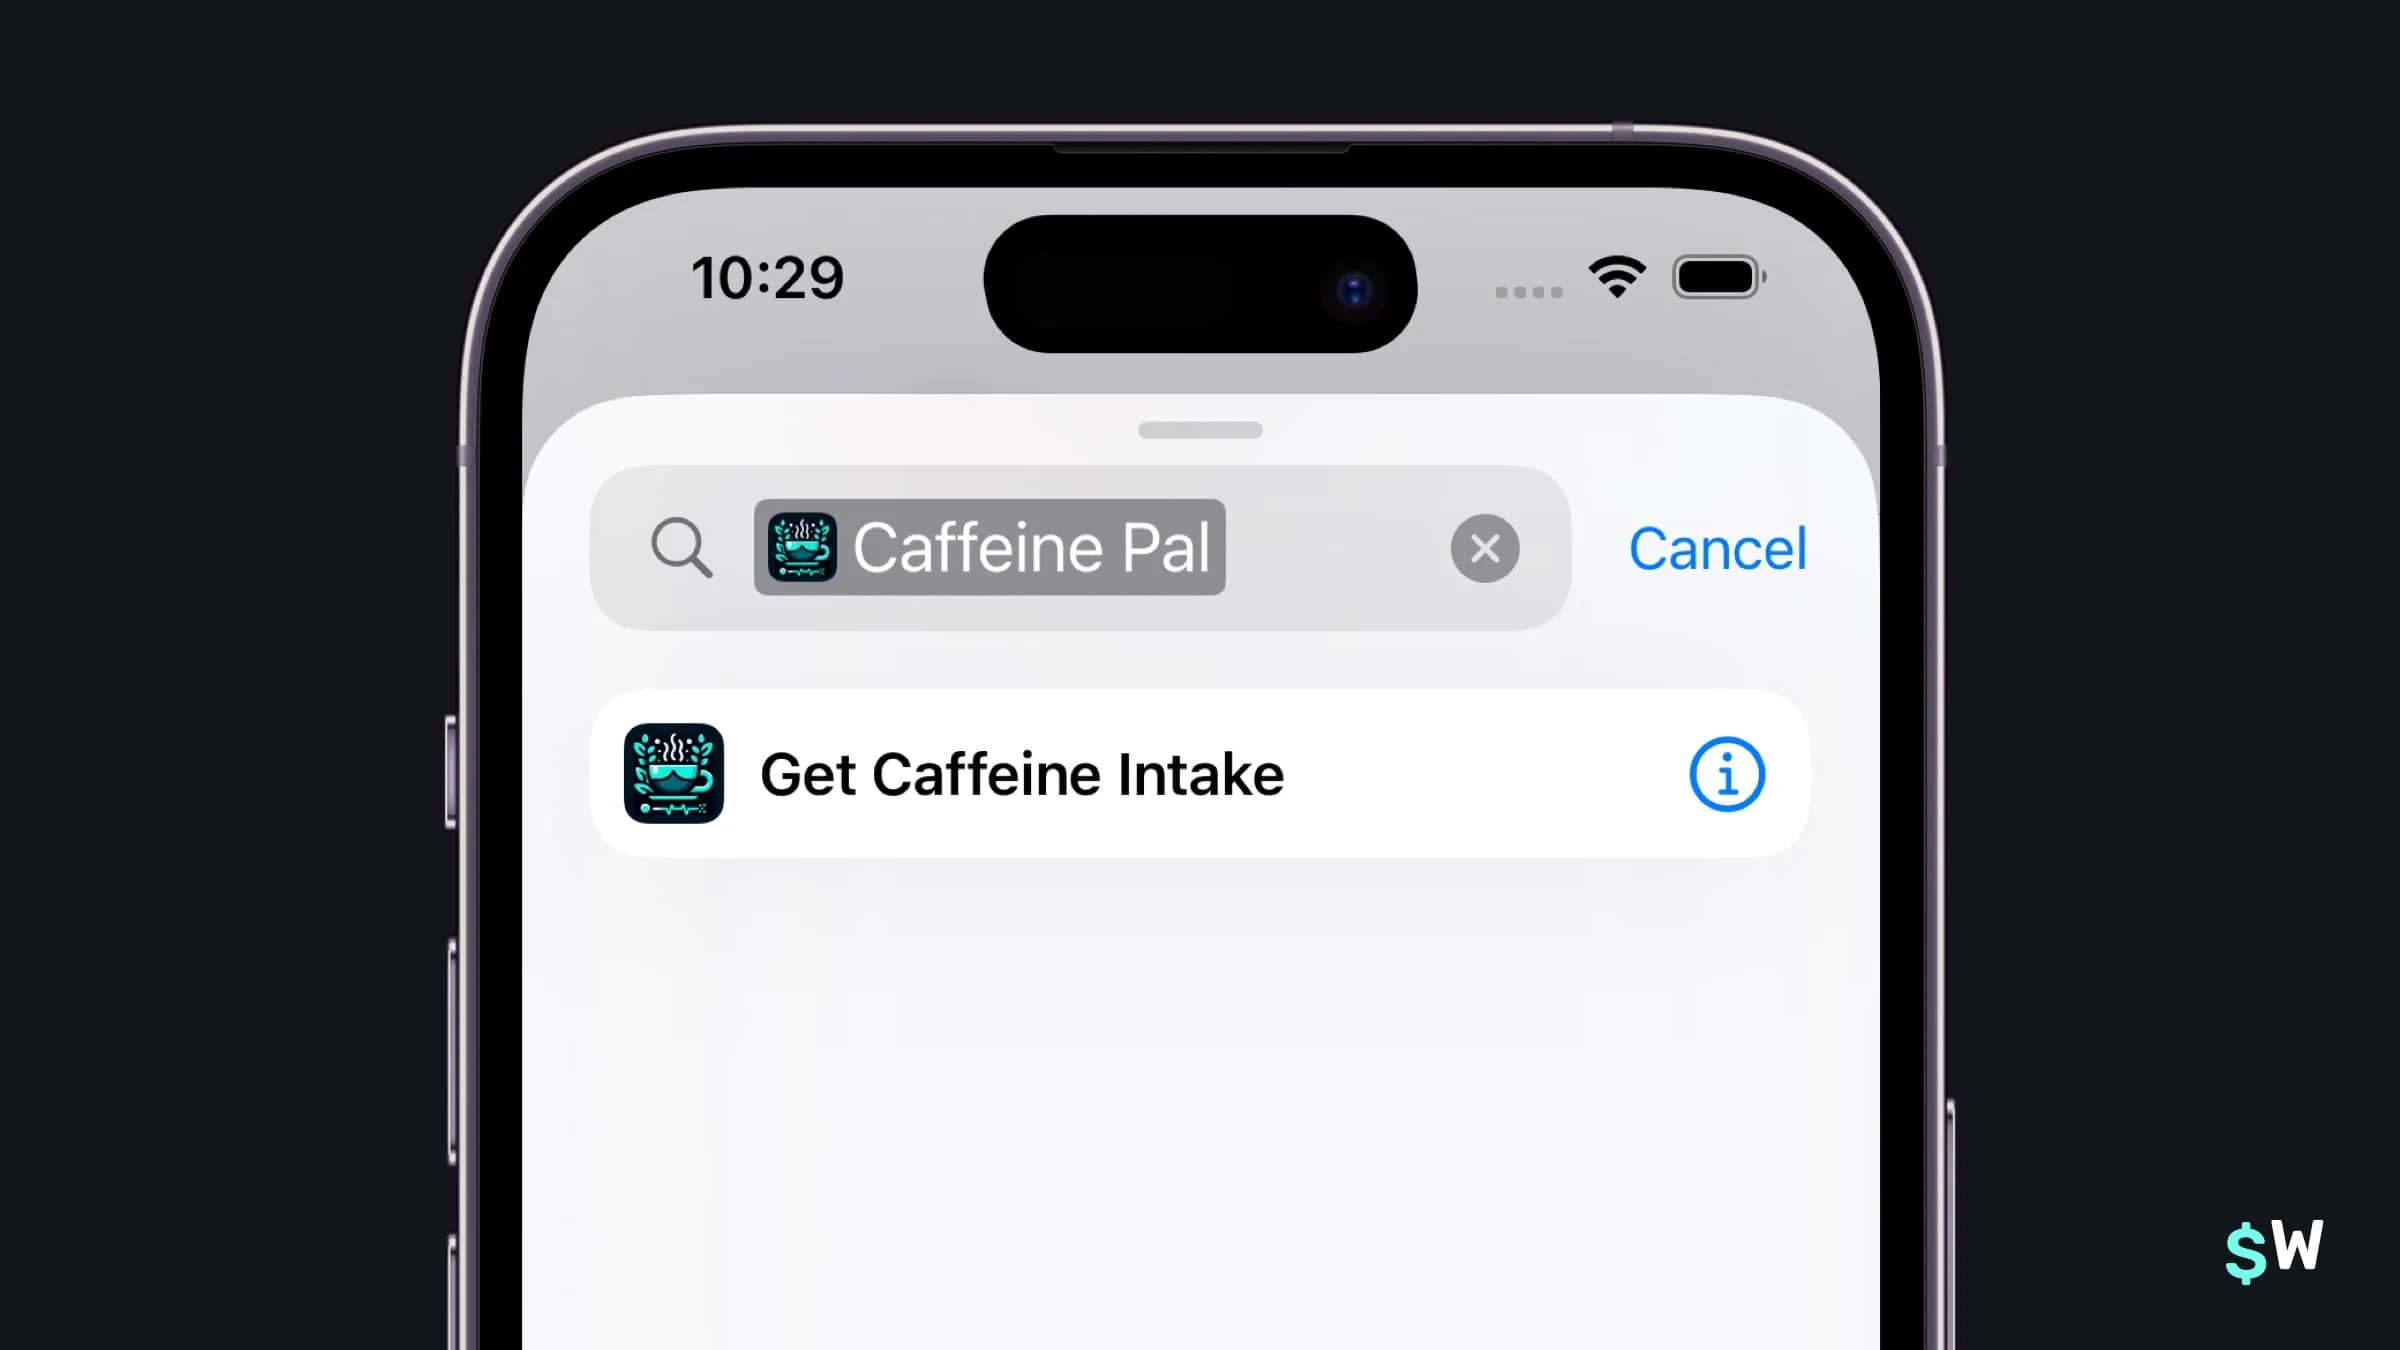
The intent immediately appears in the Shortcuts app, allowing users to create custom shortcuts. Users can invoke it via voice command: "Get caffeine intake in Caffeine Pal." To increase visibility, use:
-
ShortcutsLink: A button linking directly to the Shortcuts app displaying all app actions - Siri's "what can I do here?" response listing available intents
-
SiriTipView: Prompts users to activate an intent via a phrase
Adding a SiriTipView to IntakeView:
var body: some View {
    NavigationStack {
        ScrollView {
            // Show Siri tip
            SiriTipView(intent: GetCaffeineIntent())
                .padding()
            // ... rest of view
        }
    }
}
Shortcuts provider
Create an AppShortcutsProvider to vend App Shortcuts — custom
shortcuts created from existing App Intents with icons, activation phrases,
and the associated intent:
struct ShortcutsProvider: AppShortcutsProvider {
    static var appShortcuts: [AppShortcut] {
        AppShortcut(intent: GetCaffeineIntent(),
                    phrases: ["Get caffeine in \(.applicationName)",
                              "See caffeine in \(.applicationName)",
                              "Show me much caffeine I've had in \(.applicationName)",
                              "Show my caffeine intake in \(.applicationName)"],
                    shortTitle: "Get Caffeine Intake",
                    systemImageName: "cup.and.saucer.fill")
    }
}
The framework automatically registers providers, making App Shortcuts discoverable even before the app launches. They appear in Spotlight search and are invocable via voice.
Intents with parameters
Parameters enable flexible intent usage. Here's an espresso shot logging intent:
struct LogEspressoIntent: AppIntent {
    static var title = LocalizedStringResource("Log Espresso Shot")
    static var description = IntentDescription("Logs some espresso.")

    @Parameter(title: "Shots")
    var shots: EspressoShot?

    static var parameterSummary: some ParameterSummary {
        Summary("Logs \(\.$shots) of caffeine")
    }

    init() {}

    init(shots: EspressoShot) {
        self.shots = shots
    }

    func perform() async throws -> some IntentResult & ProvidesDialog {
        if shots == nil {
            shots = try await $shots.requestValue(.init(stringLiteral: "How many shots of espresso are you drinking?"))
        }

        let store: CaffeineStore = .shared
        store.log(espressoShot: shots!)

        // Refresh widgets
        WidgetCenter.shared.reloadAllTimelines()

        return .result(dialog: .init("Logged \(store.formattedAmount(.init(value: Double(shots!.rawValue), unit: .milligrams)))."))
    }
}
Reuse app enums by conforming to AppEnum:
extension EspressoShot: AppEnum {
    static var typeDisplayRepresentation: TypeDisplayRepresentation = .init(name: "Shots")
    static var typeDisplayName: LocalizedStringResource = "Shots"
    static var caseDisplayRepresentations: [EspressoShot: DisplayRepresentation] = [
        .single: "Single",
        .double: "Double",
        .triple: "Triple"
    ]
}
Critical implementation details:
- Include a default initializer (required by the framework)
- Include an initializer accepting parameters
- Use
$parameter.requestValue()to prompt users for values
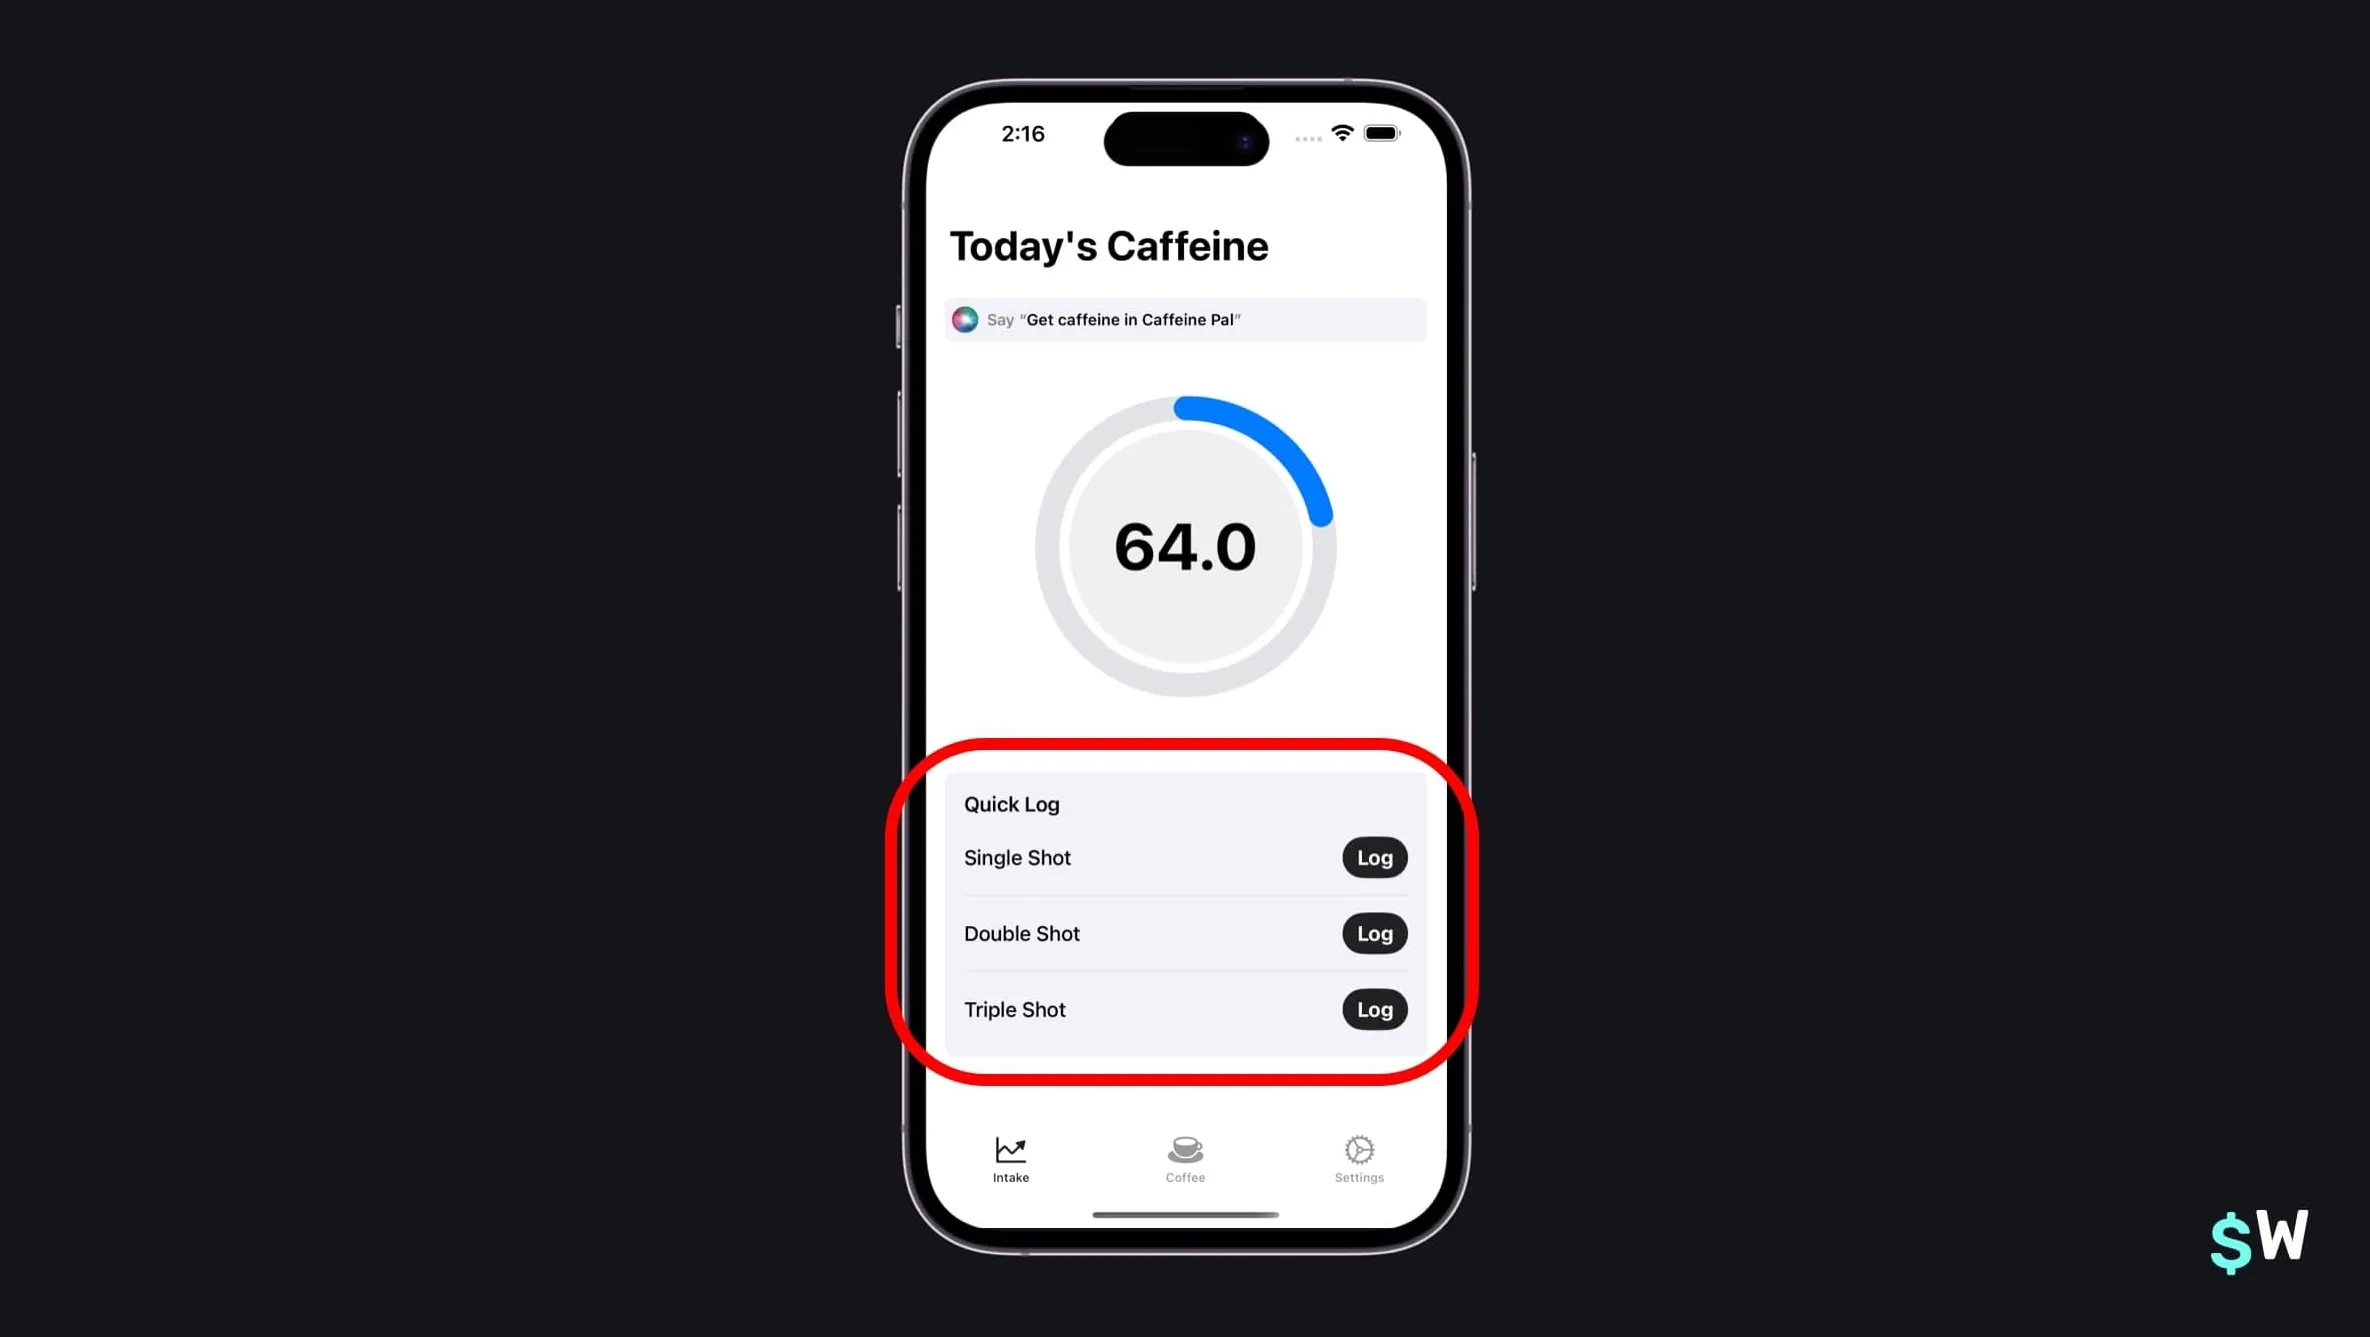
Interactive widgets
Starting in iOS 17, buttons and toggles in WidgetKit can use intents:
struct LogEspressoWidgetView : View {
    let store: CaffeineStore = .shared
    var entry: EspressoTimelineProvider.Entry

    var body: some View {
        VStack(alignment: .leading) {
            Text("Today's Caffeine:")
                .font(.caption)
                .padding(.bottom, 4)
            Text(store.formattedAmount(.init(value: entry.amount, unit: .milligrams)))
                .font(.caption.weight(.semibold))
                .foregroundStyle(Color.secondary)
            Spacer()
            // Our intent being reused
            Button(intent: LogEspressoIntent(shots: .single)) {
                Text("Log a Shot")
                    .frame(minWidth: 0, maxWidth: .infinity)
            }
        }
    }
}
Reuse intents throughout the app to avoid duplicating business logic. Main
app buttons can also use LogEspressoIntent:
struct QuickAddButton: View {
    @Environment(PurchaseOperations.self) private var storefront: PurchaseOperations
    @Environment(CaffeineStore.self) private var store: CaffeineStore

    let text: String
    let shots: EspressoShot

    var body: some View {
        HStack {
            Text(text)
                .fontWeight(.medium)
            Spacer()
            // Our LogEspressoIntent in use once again
            Button(intent: LogEspressoIntent(shots: shots)) {
                Text("Log")
                    .foregroundStyle(Color.inverseLabel)
                    .fontWeight(.bold)
            }
            .buttonBorderShape(.capsule)
            .buttonStyle(.borderedProminent)
        }
        .padding(.vertical, 6)
    }
}
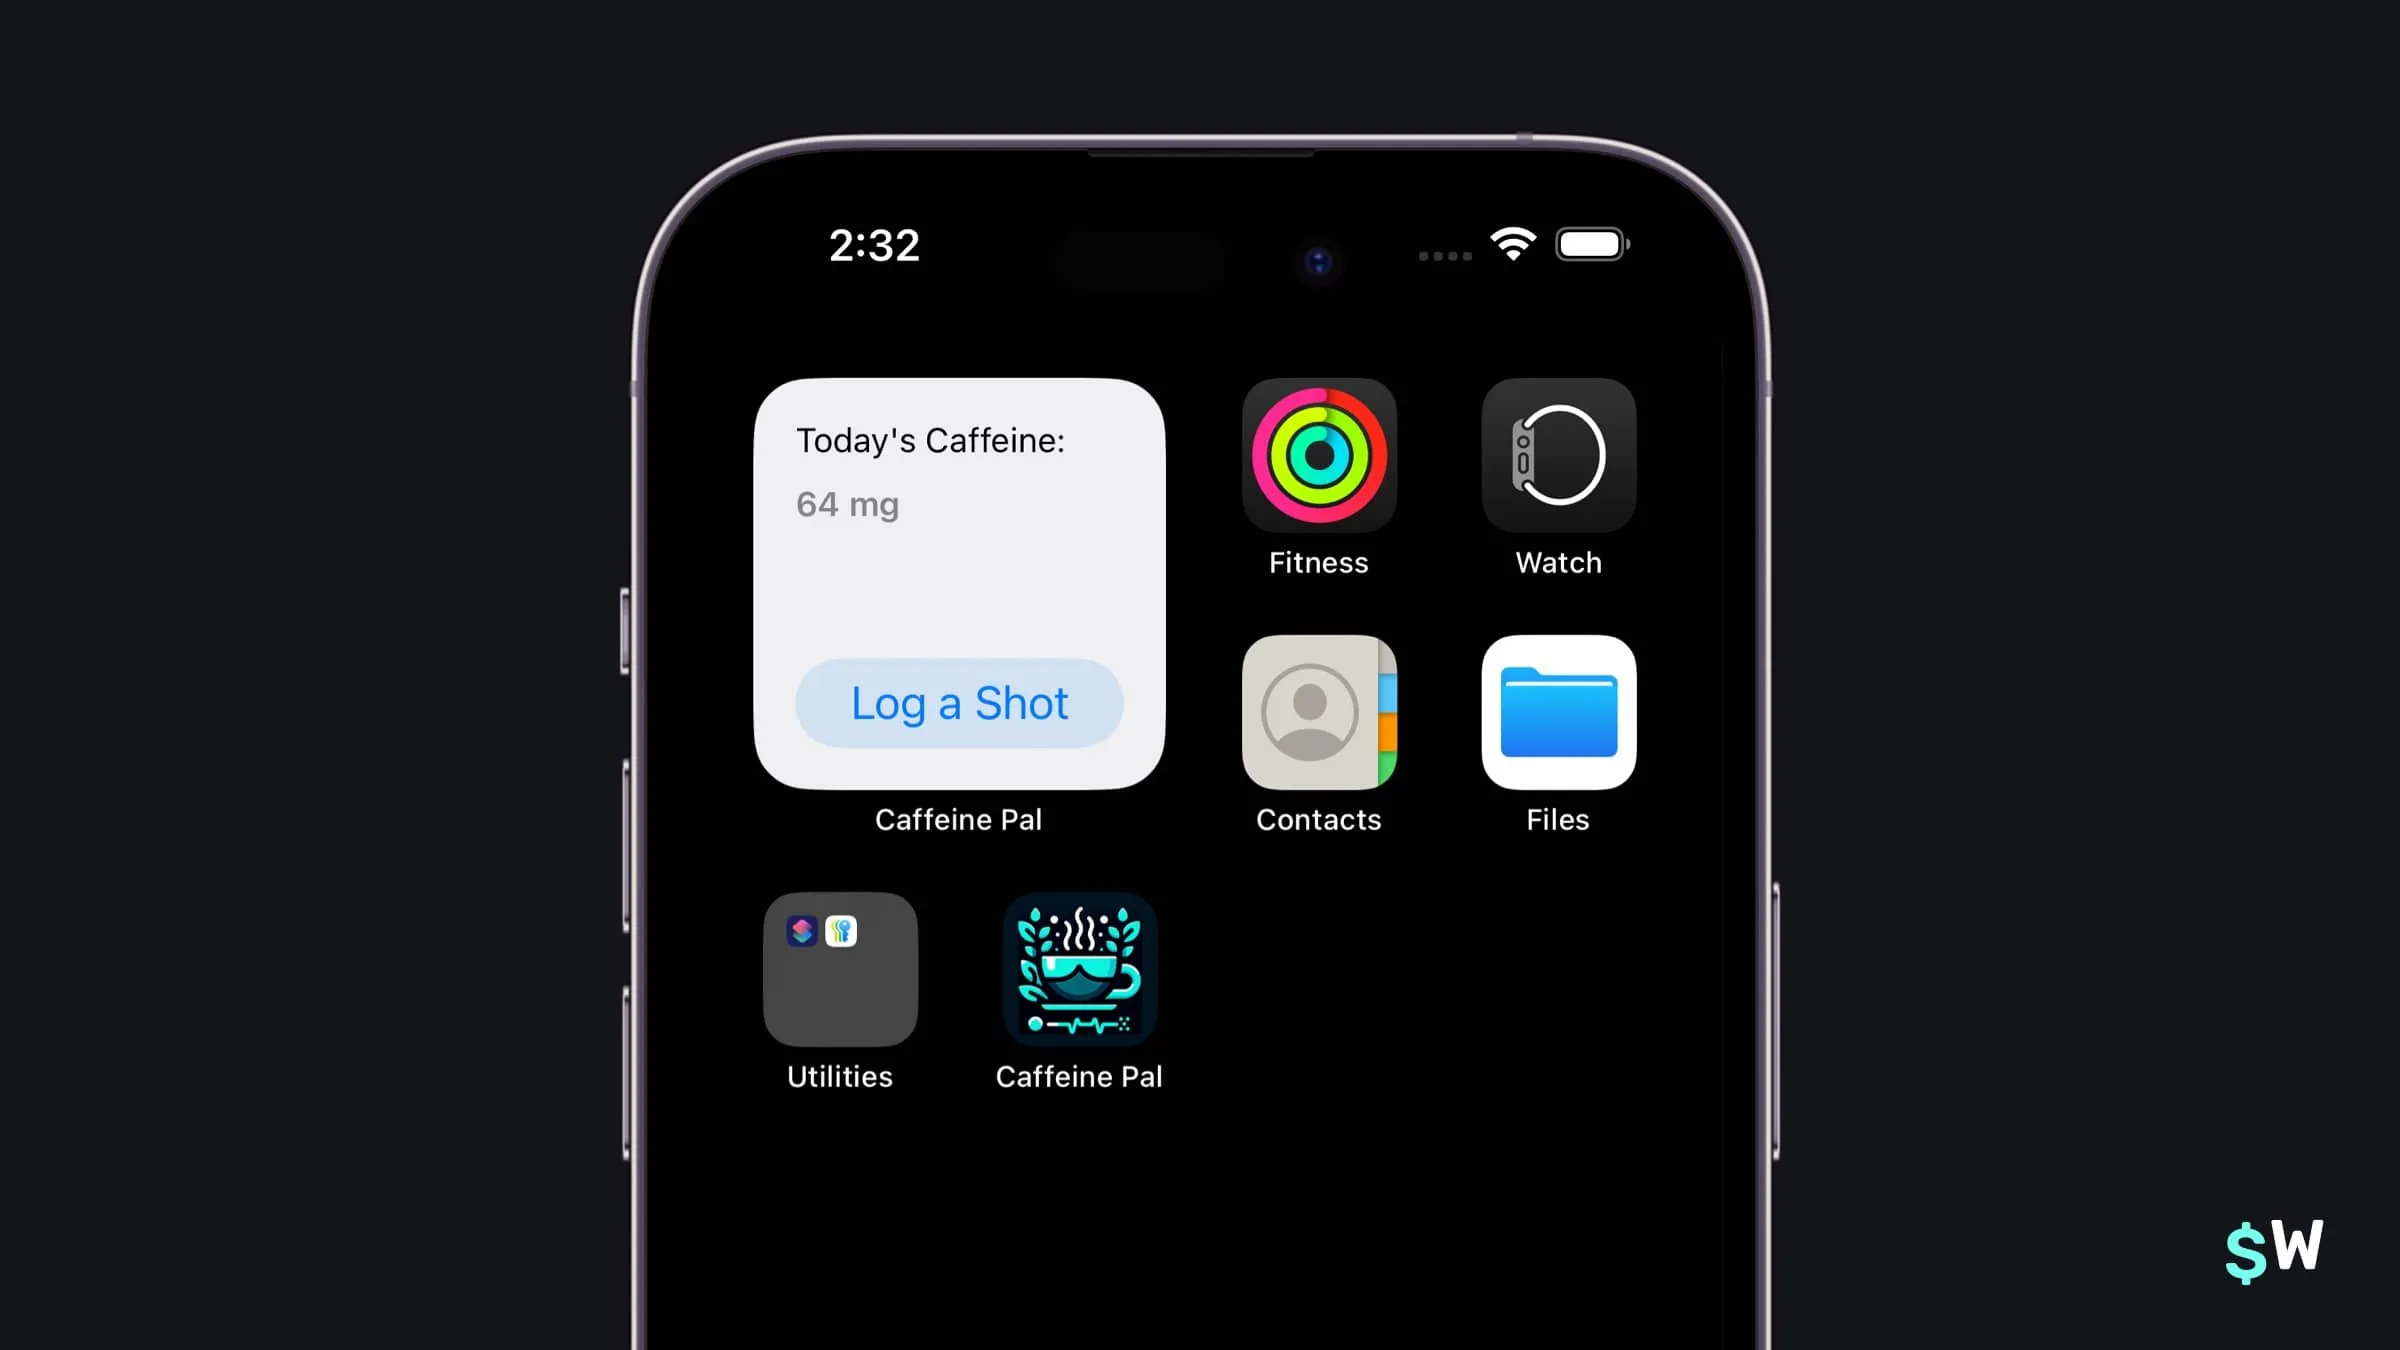
Controls
iOS 18 introduces Control APIs enabling Lock Screen and Control Center widgets:
struct CaffeinePalWidgetsControl: ControlWidget {
    static let kind: String = "com.superwall.caffeinePal.Caffeine-Pal.CaffeinePalWidgets"
    var body: some ControlWidgetConfiguration {
        StaticControlConfiguration(kind: Self.kind) {
            // Use our App Intent once again
            ControlWidgetButton(action: GetCaffeineIntent()) {
                Label("Caffeine Intake", systemImage: "cup.and.saucer.fill")
            }
        }
        .displayName("Get Caffeine Intake")
        .description("Shows how much caffeine you've had today.")
    }
}
Wrapping up
App Intents distribute your app's functionality throughout iOS. With approximately 100 lines of code, these two intents enabled support for:
- Siri
- The Shortcuts App
- Spotlight Search
- Interactive Widgets
- Control widgets
Apple Intelligence integration becomes possible by adopting
Transferable and specific schemas for enhanced flexibility.
Creating an App Intent simply requires adopting the AppIntent
protocol and implementing the perform function — far simpler
than previous approaches. As long as your codebase provides accessible
objects for data interaction, models, and APIs, building numerous intents
is feasible.