App Intents Interactive Snippets in iOS 26
Implement an interactive snippet from scratch, and learn how to create your own.
A primary theme from W.W.D.C. 24 was Apple Intelligence, and how App Intents played into it. This year, with W.W.D.C. 25, that not only was still a common theme, but it was even more prominent. In this post, we're going to look at the marquee addition to the App Intents framework, and create an example that you can expand on.
If you're new to App Intents, definitely give our App Intents Field guide post a read first. All of the concepts covered here will build upon that foundation. If you want to see the completed example or follow along, grab the code on GitHub — the world's best caffeine tracking app written in SwiftUI, for Superwall tutorials.
Parts at play
Even if you're familiar with App Intents framework, or read the linked post I just mentioned above, it helps to have the critical terms fresh in your mind. If you're already good to go with these terms, skip to the next section.
When it comes to the framework, there are three core concepts you have to understand: App intents, app entities and queries, and app shortcuts. Some of the terms can feel interchangeable, but they are all distinct ideas:
- App Intent: This is the actual
Structyou make that performs an action. It has the logic in theperformfunction, and it always return some type of intent result. - App Entity: An app entity is a lightweight representation
of your data models. For a sports app, you might have a
Teamstruct. In the App Intents world, you'd have aTeamEntitywhich would have an identifier to fetch or associate back to your app'sTeammodel. Re-using your entire model in an entity is not encouraged, entities should always contain as much as needed, but as little as necessary about the model they represent. - Entity Query: These tie one-to-one with an app entity, and they aren't complicated at all — they simply represent a way to fetch entities from whatever data store you're using. They come in a few different flavors, such as text search or suggesting common results. They are adopted via protocols.
- App Shortcut: Finally, an app shortcut. While we don't create these in this post, it helps to disambiguate them between the other terms. A shortcut is made in Apple's Shortcuts app, and they are comprised of one or more actions, which themselves can be app intents you've created. So, an app shortcut, then, is made from an app intent you supply to iOS at compile time. Then, it's immediately available in Shortcuts, Spotlight and other places. This is what Apple means by app shortcuts requiring "zero configuration", they're good to go. It's like you went into Shortcuts, made a custom shortcut using your app intent, and packaged it up for your users ahead of time - they didn't have to create it themselves.
With that small refresher done, let's move on to what's new in iOS 26.
Interactive snippets
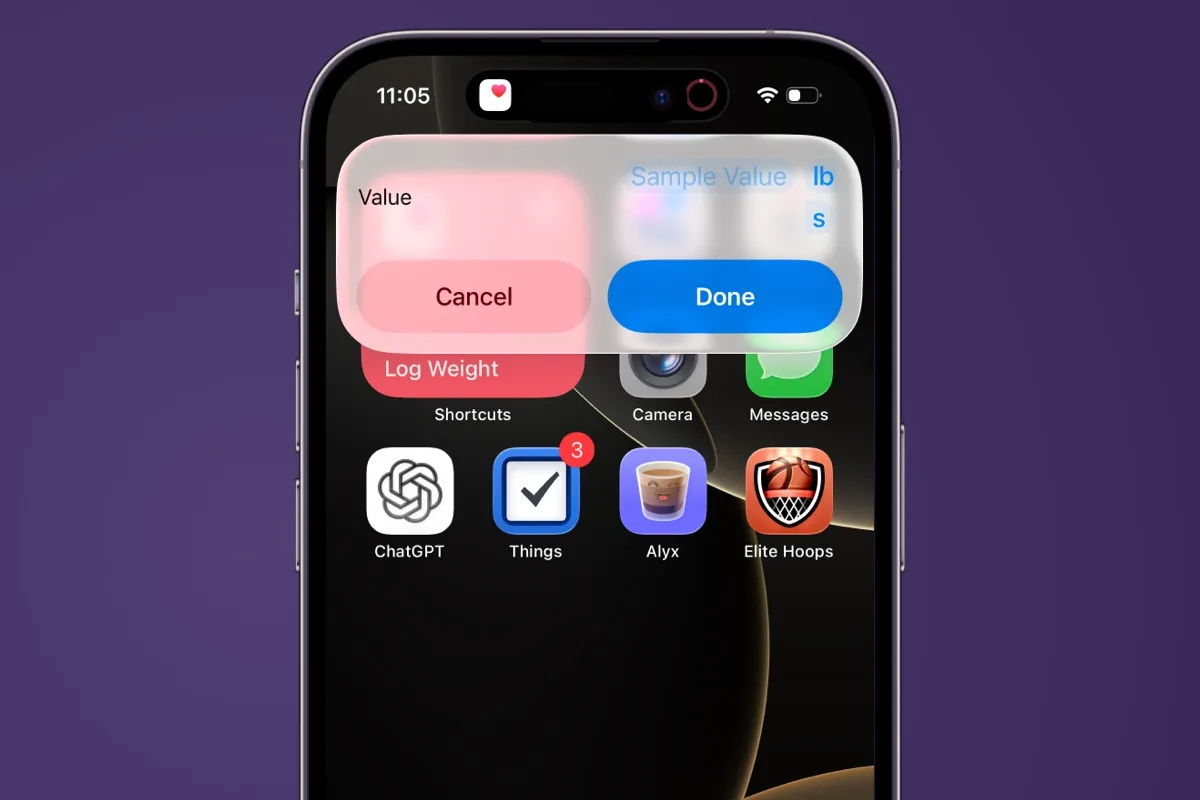
As I hinted at above, this is the "big" feature in App Intents this year. Using them, you can return interactive SwiftUI views to fire off certain app intents. If you're like me, you might be thinking that iOS has had "interactive" intents for a few years now. So long as you had parameters, you could run the intent and the system would ask for them. For example, I had a shortcut which asks for a number value to log weight in the Health app:
While doing my research for this post, I've come up with a few critical reasons why this new API is much more capable than what we've previously had:
- You can return first class SwiftUI views here. Before, the system drew the view however it needed. It was very basic, but that was by design (and, I'm sure, necessary given the context).
- This isn't "fire and forget", you can keep using the intent and continue performing actions until the user decides they're done.
- You can chain intents together to create entire flows, all using custom SwiftUI views along the way.
Perhaps confusingly, though, Apple seems to show an interactive snippet working from a Control Center widget in a W.W.D.C. session. But, the documentation explicitly states that isn't possible, so just a heads up!
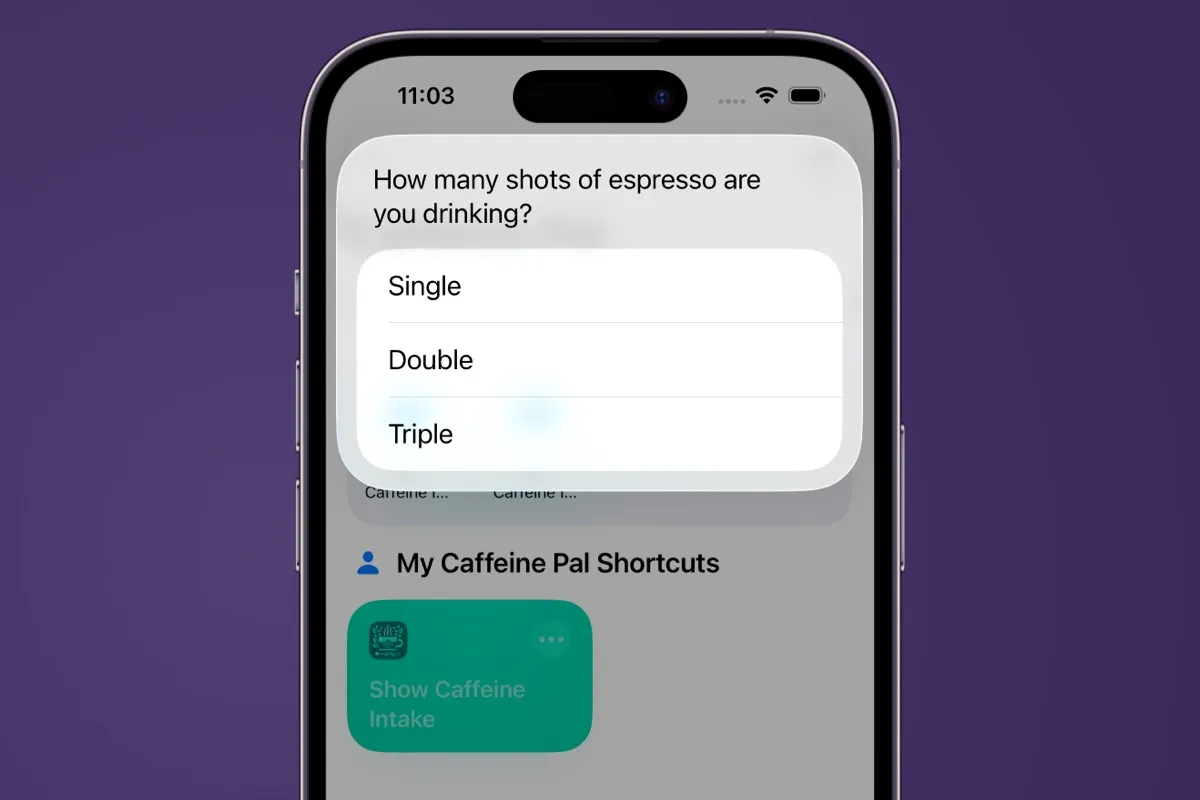
To see a practical example, we'll show a UI of caffeine intake for the day and we'll add three buttons to log a single, double or tripe shot. As I mentioned above, we can see the "old" way this worked — the intent fires and you pick your shot amount:
That was created from this intent:
struct LogEspressoIntent: AppIntent {
    static var title = LocalizedStringResource("Log Espresso Shot")
    static var description = IntentDescription("Logs some espresso.")

    @Dependency var store: CaffeineStore

    @Parameter(title: "Shots")
    var shots: EspressoShot?

    static var parameterSummary: some ParameterSummary {
        Summary("Logs \(\.$shots) of caffeine")
    }

    init() {}

    init(shots: EspressoShot) {
        self.shots = shots
    }

    func perform() async throws -> some IntentResult & ProvidesDialog {
        if shots == nil {
            shots = try await $shots.requestValue(.init(stringLiteral: "How many shots of espresso are you drinking?"))
        }

        await store.log(espressoShot: shots!)
        let val = await "Logged \(store.formattedAmount(.init(value: Double(shots!.rawValue), unit: .milligrams)))."

        // Refresh widgets
        WidgetCenter.shared.reloadAllTimelines()

        return .result(dialog: .init(stringLiteral: val))
    }
}
We'll improve this with the new API by showing the caffeine you've had for the day in real time, update it along with shots you log, and allow users to log as many shots as they need.
We're going to re-purpose an existing intent we have to do this:
struct GetCaffeineIntent: AppIntent {
    static var title = LocalizedStringResource("Get Caffeine Intake")
    static var description = IntentDescription("Shows how much caffeine you've had today.")

    func perform() async throws -> some IntentResult & ReturnsValue<Double> & ProvidesDialog {
        let store = CaffeineStore.shared
        let amount = store.amountIngested
        return .result(value: amount,
                       dialog: .init("You've had \(store.formattedAmount(for: .dailyIntake))."))
    }
}
A quick disclaimer before we continue, understanding how this all fits together takes a bit of time. I've had to watch Apple's session over more than once, look over notes and review their sample code before it clicked for me. So, I'm going to list out the whole flow next, and you'll probably want to refer back to it a few times if you're building your own snippet:
-
Create an app intent that returns a snippet intent, with
ShowsSnippetIntentas part of the return type. -
Return a
SnippetIntentin theresult. -
Now, you implement the
SnippetIntentitself. Any variable it needs must be marked with@Parameter, otherwise the system won't populate them. Stick to only app entities or primitive values, since these can be queried several times. -
This intent returns
ShowsSnippetIntentfrom it, which has aViewyou can associate to it. Also, fetch any app state or data you need here in theperformmethod, this is important! - Each button or toggle in the view has to be fired from an app intent, so you'll either use existing ones or create what you need.
- Create the actual view which uses intents to perform actions.
-
From there, you can keep returning different
SnippetIntenttypes if you need to chain interactive flows together - basically repeating the steps over. We aren't doing that here, we're going to stick to improving our current example.
Also, if you're using the sample project, you can filter for "😎" in
Xcode's console. I've added some print statements along the critical
paths. That way, you can easily get a feel for the life cycle of interactive
snippets, too.
In GetCaffeineIntent, we'll start by changing the return type
to also return a ShowsSnippetIntent, signaling to the system that
an interactive snippet will return too.
struct GetCaffeineIntent: AppIntent {
    static var title = LocalizedStringResource("Get Caffeine Intake")
    static var description = IntentDescription("Shows how much caffeine you've had today.")

    @Dependency var store: CaffeineStore

    func perform() async throws -> some IntentResult & ReturnsValue<Double> & ShowsSnippetIntent {
        let amount = await store.amountIngested

        print("😎 Get caffeine intent fired")

        return .result(value: amount,
                       snippetIntent: ShowCaffeineIntakeSnippetIntent())
    }
}
We'll cover ShowCaffeineIntakeSnippetIntent next, but notice the
snippetIntent in the returned result. Also, we're using a dependency
from our primary app target. To do that, it must be registered when your app
fires up:
import SwiftUI
import AppIntents

@main
struct Caffeine_PalApp: App {
    @State private var store: CaffeineStore = .init()

    init() {
        ShortcutsProvider.updateAppShortcutParameters()

        // Make appData available to app intents
        let appData = self.store
        AppDependencyManager.shared.add(dependency: appData)
    }

    var body: some Scene {
        WindowGroup {
            ContentView()
        }
        .environment(store)
    }
}
Now, we'll implement ShowCaffeineIntakeSnippetIntent, and it's
responsible for gathering any data the SwiftUI view of the interactive
snippet will need, and then return it. These type of intents adopt SnippetIntent:
struct ShowCaffeineIntakeSnippetIntent: SnippetIntent {
    static let title: LocalizedStringResource = "Caffeine Snippet"
    static let isDiscoverable: Bool = false

    @Dependency var store: CaffeineStore

    func perform() async throws -> some IntentResult & ShowsSnippetView {
        let current = await store.amountIngested
        print("😎 Firing up ShowCaffeineIntakeSnippetIntent - ingested \(current)")
        return .result(view: CaffeineIntakeSnip(store: store))

    }
}
Notice how we're getting the current value inside of the perform function. Here, it's just for logging purposes, but if you had any data or
flags that a view needed, you'd follow the same pattern. Fetch values inside of the perform function. Finally, in the .result, we package up the view and return it. The system knows the view will be
used with an interactive snippet because of the ShowsSnippetView return type.
Step five
Interactivity in these snippets is all driven from other app intents you
make. This is how interactive widgets work, too. All of the same concepts
apply, so if you're familiar with making interactive widgets — you'll be
able to move quickly with snippets. In our case, I created an intent that
takes in an Int to represent how much caffeine to log:
struct LogShotIntent: AppIntent {
    static let title: LocalizedStringResource = "Log Caffeine Amount"
    static let isDiscoverable: Bool = false

    @Parameter
    var amount: Int

    @Dependency
    var store: CaffeineStore

    func perform() async throws -> some IntentResult {
        let current = await store.formattedAmount()
        print("😎 Firing intent with \(self.amount) and current is \(current)")
        await store.log(Double(amount))
        let new = await store.formattedAmount()
        print("😎 Returning from intent and current is \(new)")
        return .result()
    }
}
There is a sneaky bit here that's easy to miss, and it has to do with parameters. You'll get a build error when you try to use this intent as-is, with Xcode giving you something along the lines of:
Cannot convert value of type 'Int' to expected argument type
        'IntentParameter'
.
The way Apple addresses this is by creating an initializer that takes in
any parameter the intent has. I follow the same pattern, and App Intents
will package anything up as its IntentParameter variety for us:
extension LogShotIntent {
    init(amount: Int) {
        self.amount = amount
    }
}
Note that we could have used the existing app intent here, which I showed earlier in this post to demonstrate the "old" way to make interactive intents. Here, I wanted to take you through an example of building it all from scratch.
Next, let's wire this all up in a view.
Step six
This is the easy part, but it does come with a bit of nuance. Here's the view:
struct CaffeineIntakeSnip: View {
    let store: CaffeineStore

    var body: some View {
        VStack(alignment: .leading) {
            Text("Todays Caffine:")
                .font(.subheadline)
                .foregroundStyle(.secondary)
            Text(store.formattedAmount())
                .font(.title)
                .contentTransition(.numericText())
                .frame(minWidth: 0, maxWidth: .infinity, alignment: .center)
                .padding(.bottom, 12)
            Spacer()
            Text("Quick Log:")
                .font(.subheadline)
                .foregroundStyle(.secondary)
                .frame(minWidth: 0, maxWidth: .infinity, alignment: .leading)
            HStack {
                Button(intent: LogShotIntent(amount: EspressoShot.single.rawValue)) {
                    Text("Single")
                }
                Spacer()
                Button(intent: LogShotIntent(amount: EspressoShot.double.rawValue)) {
                    Text("Double")
                }
                Spacer()
                Button(intent: LogShotIntent(amount: EspressoShot.triple.rawValue)) {
                    Text("Triple")
                }
            }
            .buttonStyle(IntentScaleButtonStyle())
        }
        .frame(minWidth: 0, maxWidth: .infinity, alignment: .center)
        .padding(12)
        .background(Color(uiColor: .secondarySystemBackground).gradient)
        .clipShape(.containerRelative)
    }
}
A few things to note about this. First, shared and persistent data modeling is required here. The view, like any SwiftUI view, can be created
several times. If we had no shared data model, then we couldn't update the actual
caffeine amount. Or, consider Apple's sample code where they have an increment
and decrement button for the number of tickets to purchase. If that was modeled
with a simple Int that was passed to each intent and view — then
the view would be torn down each time and shown again. It wouldn't animate at
all.
If you want values to animate and persist throughout the life cycle of an
interactive snippet, then use @Dependency to do it inside your
app intents. Then, in the view itself, pass it as a parameter. That's what we've
done here. Each intent references CaffeineStore via the dependency
property wrapper, and the view itself takes it in as part of its initializer.
Testing it out
To see this in action, either run the intent from Shortcuts or add the
Shortcut widget and configure it with the intent. When it runs, you can log
as much caffeine as you need, see the total amount updated in real time and
decide when you're finished by tapping "Done" (instead of only being able
to take one action at a time). Even better, when you open the app, the
caffeine logged from the intent will show in the app, too. That's because
of the shared dependency we created with the CaffeineStore:
Pretty neat! The snippet displayed the amount of caffeine logged for the day, updated it interactively, animated the changes and all of that data was shared with the app, too. You can tell by seeing the caffeine amount that shows in the app once the snippet was dismissed.
Further resources
This post should give you enough to get going with interactive snippets, but the API has more for you. For example, you can request confirmation, manually request snippet reloads, string snippets together and more. To further your understanding, definitely check out W.W.D.C. video and its related sample code.
Wrapping up
App Intents continues to grow each year. Apple is sending a clear signal that it's a framework to invest in. Along with the features listed here, there's also a bunch of other tweaks and quality-of-life fixes. Not to mention, developers can hook into Visual Lookup too.
And, as always, if you're looking for a way to make paywalls as flexible as your App Intents — look no further than Superwall. Sign up for a free account today to get started testing paywalls in minutes.